Image Map

6.19.2014

Steakhouse Dinner

My husband is, quite literally, the pickiest eater I have ever known. He will not eat anything that swims, he’s not huge on most vegetables, eats very little "healthy" food, and usually acts as if trying something new will kill him. 

But his favorite thing is when I make him a classic steakhouse meal:

Seared filet mignon,


with crispy matchstick potatoes,


and of course, the classic wedge salad.   

 
It's a delicious and fairly simple meal, although things can get a little smoky while cooking the steak!

Seared Filet Mignon
2 5-6 oz filet mignon steaks (about 1 inch thick)
Salt
Cracked black pepper
Oil
Two slivers of butter

Heat a cast iron pan over high heat until screaming hot. I usually do this for somewhere between 3-5 minutes.

While pan preheats, coat your steaks very generously on both sides with salt and cracked black pepper.


When ready to cook, brush the pan with a small amount of oil. Place the steaks in the pan, and allow to sear for 3 minutes.  Flip to the other side and sear until desired doneness. I do ours to 130°, which is medium rare.

Just before serving, top each steak with a sliver of butter.  Sometimes I also use a drizzle of Trader Joe's balsamic syrup.

Serves 2.

Matchstick Potatoes, adapted from Ina Garten
4 baking potatoes, peeled
Corn oil (I used almost a full quart)
Salt

Preheat oven to 350°. Fill a large pot or Dutch oven with 1 inch of oil and heat it to 350°.

Slice potatoes into thin matchsticks, using a mandolin or the shredding disc of your food processor. Drop potatoes into a bowl of cold water as you work.

When ready to fry, drain potatoes very well. In batches, drop them in the hot oil and cook 3-5 minutes, until golden brown.  Remove to a paper towel lined plate, and sprinkle generously with salt. Repeat.

Keep warm on a baking sheet in the 350 degree oven for up to a half hour.

Serves 2-4.

Wedge Salad
½ head iceberg lettuce
½  pint cherry tomatoes, halved
1 rib celery, diced
4 slices bacon, cooked until crisp and chopped
Chives
Ranch or blue cheese dressing

Slice the half head of lettuce into four wedges and arrange on a plate.  Top with tomatoes, celery, bacon, chives, and dressing.

Serves 2.

(I think this would be much better if you made your own dressing, using a recipe like the one here, but I told you, I have a picky husband, and a blue cheese is on the no-fly list).

Next project, fancy sauces for the steak. Anyone have any good recipes?

6.11.2014

Spaghetti alla Checca


One stand at my local farmer's market has the most incredible yellow cherry tomatoes.  They are sweet and delicious and taste like summer.

I wanted a way to use these beauties in an uncooked tomato sauce, so I test drove an old recipe from Giada de Laurentiis' first cookbook- Checca Sauce, an uncooked mix of tomatoes, scallions, and fresh mozzarella. It came together in a few quick pulses in the food processor, and perfectly showcased the taste of summer.

Spaghetti all Checca, from Giada de Laurentiis
The original recipe calls for raw garlic; I hate the taste of that so I modified it slightly by cooking the garlic. 

1 box thin spaghetti
4 scallions, white and green parts, coarsely chopped
1 garlic clove
2 pints cherry tomatoes- use fresh, in-season tomatoes! No plastic packaged grocery store tomatoes here
1/2 cup fresh basil leaves
2 tbsp grated Parmesan
Salt and pepper to taste
1/4 cup olive oil
4 oz fresh mozzarella, cubed

Saute the garlic clove in oil until lightly golden. Toss garlic clove and set oil aside to cool.

Bring a large pot of water to a boil. When boiling, add lots of salt and your spaghetti.

In your food processor, pulse scallions, tomatoes, half of the basil, Parmesan, and reserved oil until tomatoes are coarsely chopped. Do not puree.

Drain pasta, reserving 1/4 cup pasta water. Top pasta with tomato mixture, adding pasta water if it looks a little dry. Toss with remaining basil leaves, salt, pepper, and fresh mozzarella. Serve immediately.

6.09.2014

Menu Card DIY

My personal favorite wedding DIY was the menus I created. They were really simple to execute, and came out looking extremely elegant. 

Pic by Spark Photography

I used Microsoft Publisher to create the menus. I started with a standard 8.5 x 11 page, and split it into two columns. 

I copied and pasted our monograms off the PDF of our invite proofs and placed that at the top. 

The text was all written in separate text boxes so that I could center it appropriately, and then I just copied and pasted from one column over to another. Very simple. I liked this because it allowed me to print two per page, which saved me about $80.

I had them printed on Opal Stardream cardstock from Cards and Pockets, like all my other DIYs.


Then, we had to cut down the middle of each page to separate them. I think Cards and Pockets would have done this, but I was being a little cheap and opted to cut them myself. 

I then used a corner rounder to round the corners, and then swiped the edges through a gold stamp pad.


Below, you can see how much that little edging added to the menus. (It also matched the gold edges on our invitation, though I cannot imagine a single person besides me would have realized that).

Pop-out

To make it easier, I ran stacks of about 20 menus at a time through the stamp pad. I had to do it twice to ensure everything got a bold enough gold color.

At the reception, we had these slipped into the fold in an ivory napkin. They looked beautiful; a DIY well worth the effort.

6.04.2014

Wedding DIY: The Programs

So here's the start of the wedding DIY posts: programs! Please be forewarned: this is NOT a project for the crafting faint of heart.

For our programs, I knew I wanted a 6x6 square booklet. The wedding colors were ivory and gold, with a lace and pearls motif running through everything, so the programs had to reflect that.  

I started with the insides of the program, brainstorming content and page size. Based on our program cover size of 6x6, I wanted the inside pages to be 5.5 x 5.5 when folded, to leave a margin. That meant the two page spread would be 5.5 tall x 11 inches wide on the computer screen. I planned to print these at home on 8.5 x 11 paper, so I knew I would need to leave a large bottom margin that I would later cut off.

So I opened a Microsoft Word document, set my page to landscape, and set my margins to .3 on the left and right, .4 on top, and 2.5 on the bottom. I formatted the page to have two columns.
I wanted four pages in the program:
1. Order of ceremony
2. Wedding participants
3. Explanation of traditions (we are interfaith, so the explanation helps if anyone's unfamiliar with something)
4. Thanks/In remembrance

I scribbled a little mini booklet on a piece of paper and folded it to see where everything needed to lay when printed in order to fold correctly, and came up with this order.

Printing these was a breeze. I wanted to print double sided, so Mr. B loaded his printer up, printed 225 copies of the first page, turned everything upside down and backwards (you may want to do a few test prints to see how your printer works), and reprinted the with page 2 on the back. We used resume paper, as it is not see through, and gives the programs a nice heft.  I would not use standard printer paper for this project.
 
Then, we had to cut off the extra big margin on the bottom. That took a cutting board, razor, and a little bit of time. (And a Sam Adams to keep from boredom, though I'm not sure that helped me cut any straighter).


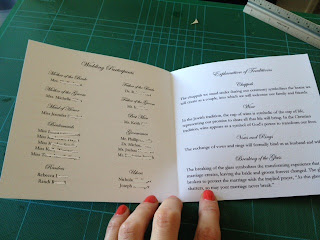
When it was done, I used a bone folder to fold the programs in half, and we wound up with the finished insides:
Open inside spread
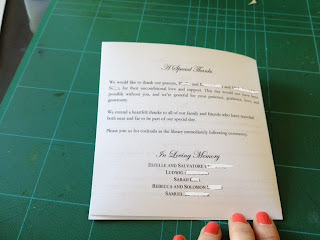
Back page- thanking our parents and remembering deceased grandparents

When they were done, I stacked them up and placed one of my heaviest shower gifts (a giant toaster oven that I still need to return) on top of them to keep them nice and flat.
 
After the insides came the cover, a much simpler task. I designed them quickly and had them printed on shimmery cardstock, scored, and cut to size by Cards and Pockets. My MOH, mom, and mother in law graciously gave up a weekend afternoon to help me put them together.


The covers had our names, wedding date, and wedding location.
A heads up if you go this route, it's not exactly budget friendly. 225 covers cost me $186, and that is before the cost of resume paper, embellishments, and tools used.
To keep up with our lace and pearls theme, I purchased a beautiful lace from MJ Trim here in New York City. Unfortunately, there was no name or style number printed on it, but here's what it looked like:
 
I cut 225 strips that were about 6 and 1/4 inches- I wanted the lace to be longer than the program.
We formed an assembly line. My mom attached the covers and the insides using a long reach stapler, which I think is a great way to make booklets. The long reach stapler allows you to set the size so that you can staple papers up to 12 inches long, rather than using a conventional stapler, which wouldn't have reached the binding.
After stapling, she handed the programs off to the rest of us, who used Mod Podge and paintbrushes to apply the lace. We applied it to the front cover and folded it over the spine to hide the staples and leave a border near the spine on the back cover.
Since the lace strips were longer than the program, once the glue dried we just cut the extra edges off, which gave us a nice straight cut. That way, you don't have to worry about cutting the lace straight at the beginning.

The finished product (also displayed on a heinous tablecloth, sorry!)


I'm very pleased with how they came out. They're definitely of a more formal and less trend-forward rustic look, and they were a heck of a lot of work, but I'm glad we did them.

If you're going to attempt a similar project my only advice would be to literally start four months in advance. By the time I got all our text together (and verified by our officiants), designed everything in Word, and ordered sample programs, it was already mid April, and I'd started the project in January.

I can't really say whether or not this was worth it, except that I genuinely enjoyed working on the project. It certainly saves no time, is not any cheaper than using Paper Divas or some similar source, but it was fun for me to be really involved in all the elements of the wedding. I think our guests enjoyed reading them as well (though, obviously, they were all left behind on the seats- no one cares that much!)


6.03.2014

Wedding Recap

With the exception of a medical calamity on my part, Mr. B and I had a wonderful anniversary. We celebrated this year with dinner at Blue Hill in the city, and now I'm spending some time revisiting our wedding photos.

Which of course, I figured I'd share. I'm also going to be sharing a few of my favorite wedding DIY projects, since they were mostly straightforward and could work for a variety of fancier events.

But today, here's some of my favorite shots from our wedding. All pictures were taken by Philly-based Spark Photography.

My favorite formal shot of us

And the formal of our bridal party- I loved the girls'champagne colored dresses (obviously)

My beautiful bridesmaids and I getting ready!

I love this view of my dress and veil. I really wish I could wear these again! (Dress was Lazaro, now discontinued)

Our table settings- white flowers, gold chargers, and blue damask linens

Our first dance (it appears a large portion of our guests are completely uninterested)

Hubbying partying it up


And some groomsmen partying

I loved the custom lighting for our Viennese table desserts

My flowers and jewelry- beautiful white peonies wrapped in a pair of rosary beads from my grandmother

My shoes- Badgley Mischka- need a reason to wear these again!!

The end of a perfect night. 


6.02.2014

Nantucket

Today, my husband and I are celebrating our second wedding anniversary. I can't believe it's been two years, and I also can't believe that things just get better and better over time. Every day of the past two years has been amazing.

I thought that in honor of that, I'd share some posts from our wedding and first anniversary. To celebrate year one, we went to Nantucket. (This year was more lowkey, just dinner in the city). I think Nantucket might be my favorite destination I've ever been, as lame as that may sound when you consider I've been to plenty of spots in Europe! But I just love a relaxing, preppy, beachy spot.

We spent the weekend last year in a luxury hotel, going sailing, eating tons of delicious meals, walking around the island, and visiting Cisco Brewery. It was the perfect way to cap off our first year and usher in our second.


Our hotel pool

Celebrating with the champagne glass favors from our wedding!


If you go, here's some things we enjoyed:

White Elephant Hotel
Straight Wharf Restaurant
Black Eyed Susan's (breakfast)
The Endeavor (Sailing excursion, $40 for 1.5 hours)
Cisco Brewery (brewery, winery, vodka distillery in one)