Image Map

6.04.2014

Wedding DIY: The Programs

So here's the start of the wedding DIY posts: programs! Please be forewarned: this is NOT a project for the crafting faint of heart.

For our programs, I knew I wanted a 6x6 square booklet. The wedding colors were ivory and gold, with a lace and pearls motif running through everything, so the programs had to reflect that.  

I started with the insides of the program, brainstorming content and page size. Based on our program cover size of 6x6, I wanted the inside pages to be 5.5 x 5.5 when folded, to leave a margin. That meant the two page spread would be 5.5 tall x 11 inches wide on the computer screen. I planned to print these at home on 8.5 x 11 paper, so I knew I would need to leave a large bottom margin that I would later cut off.

So I opened a Microsoft Word document, set my page to landscape, and set my margins to .3 on the left and right, .4 on top, and 2.5 on the bottom. I formatted the page to have two columns.
I wanted four pages in the program:
1. Order of ceremony
2. Wedding participants
3. Explanation of traditions (we are interfaith, so the explanation helps if anyone's unfamiliar with something)
4. Thanks/In remembrance

I scribbled a little mini booklet on a piece of paper and folded it to see where everything needed to lay when printed in order to fold correctly, and came up with this order.

Printing these was a breeze. I wanted to print double sided, so Mr. B loaded his printer up, printed 225 copies of the first page, turned everything upside down and backwards (you may want to do a few test prints to see how your printer works), and reprinted the with page 2 on the back. We used resume paper, as it is not see through, and gives the programs a nice heft.  I would not use standard printer paper for this project.
 
Then, we had to cut off the extra big margin on the bottom. That took a cutting board, razor, and a little bit of time. (And a Sam Adams to keep from boredom, though I'm not sure that helped me cut any straighter).


When it was done, I used a bone folder to fold the programs in half, and we wound up with the finished insides:
Open inside spread
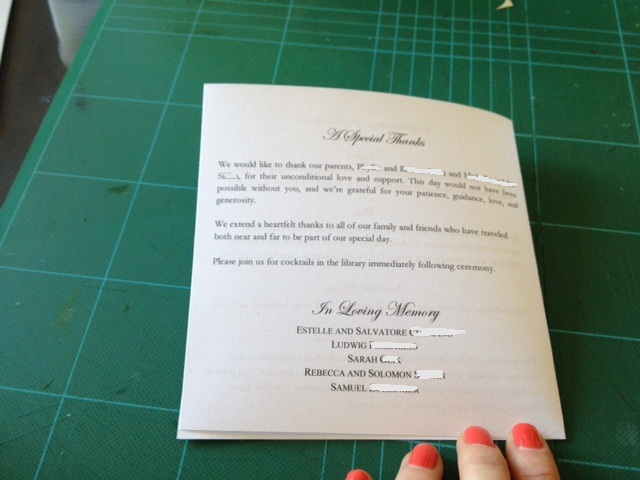
Back page- thanking our parents and remembering deceased grandparents

When they were done, I stacked them up and placed one of my heaviest shower gifts (a giant toaster oven that I still need to return) on top of them to keep them nice and flat.
 
After the insides came the cover, a much simpler task. I designed them quickly and had them printed on shimmery cardstock, scored, and cut to size by Cards and Pockets. My MOH, mom, and mother in law graciously gave up a weekend afternoon to help me put them together.


The covers had our names, wedding date, and wedding location.
A heads up if you go this route, it's not exactly budget friendly. 225 covers cost me $186, and that is before the cost of resume paper, embellishments, and tools used.
To keep up with our lace and pearls theme, I purchased a beautiful lace from MJ Trim here in New York City. Unfortunately, there was no name or style number printed on it, but here's what it looked like:
 
I cut 225 strips that were about 6 and 1/4 inches- I wanted the lace to be longer than the program.
We formed an assembly line. My mom attached the covers and the insides using a long reach stapler, which I think is a great way to make booklets. The long reach stapler allows you to set the size so that you can staple papers up to 12 inches long, rather than using a conventional stapler, which wouldn't have reached the binding.
After stapling, she handed the programs off to the rest of us, who used Mod Podge and paintbrushes to apply the lace. We applied it to the front cover and folded it over the spine to hide the staples and leave a border near the spine on the back cover.
Since the lace strips were longer than the program, once the glue dried we just cut the extra edges off, which gave us a nice straight cut. That way, you don't have to worry about cutting the lace straight at the beginning.

The finished product (also displayed on a heinous tablecloth, sorry!)


I'm very pleased with how they came out. They're definitely of a more formal and less trend-forward rustic look, and they were a heck of a lot of work, but I'm glad we did them.

If you're going to attempt a similar project my only advice would be to literally start four months in advance. By the time I got all our text together (and verified by our officiants), designed everything in Word, and ordered sample programs, it was already mid April, and I'd started the project in January.

I can't really say whether or not this was worth it, except that I genuinely enjoyed working on the project. It certainly saves no time, is not any cheaper than using Paper Divas or some similar source, but it was fun for me to be really involved in all the elements of the wedding. I think our guests enjoyed reading them as well (though, obviously, they were all left behind on the seats- no one cares that much!)


6.03.2014

Wedding Recap

With the exception of a medical calamity on my part, Mr. B and I had a wonderful anniversary. We celebrated this year with dinner at Blue Hill in the city, and now I'm spending some time revisiting our wedding photos.

Which of course, I figured I'd share. I'm also going to be sharing a few of my favorite wedding DIY projects, since they were mostly straightforward and could work for a variety of fancier events.

But today, here's some of my favorite shots from our wedding. All pictures were taken by Philly-based Spark Photography.

My favorite formal shot of us

And the formal of our bridal party- I loved the girls'champagne colored dresses (obviously)

My beautiful bridesmaids and I getting ready!

I love this view of my dress and veil. I really wish I could wear these again! (Dress was Lazaro, now discontinued)

Our table settings- white flowers, gold chargers, and blue damask linens

Our first dance (it appears a large portion of our guests are completely uninterested)

Hubbying partying it up


And some groomsmen partying

I loved the custom lighting for our Viennese table desserts

My flowers and jewelry- beautiful white peonies wrapped in a pair of rosary beads from my grandmother

My shoes- Badgley Mischka- need a reason to wear these again!!

The end of a perfect night. 


6.02.2014

Nantucket

Today, my husband and I are celebrating our second wedding anniversary. I can't believe it's been two years, and I also can't believe that things just get better and better over time. Every day of the past two years has been amazing.

I thought that in honor of that, I'd share some posts from our wedding and first anniversary. To celebrate year one, we went to Nantucket. (This year was more lowkey, just dinner in the city). I think Nantucket might be my favorite destination I've ever been, as lame as that may sound when you consider I've been to plenty of spots in Europe! But I just love a relaxing, preppy, beachy spot.

We spent the weekend last year in a luxury hotel, going sailing, eating tons of delicious meals, walking around the island, and visiting Cisco Brewery. It was the perfect way to cap off our first year and usher in our second.


Our hotel pool

Celebrating with the champagne glass favors from our wedding!


If you go, here's some things we enjoyed:

White Elephant Hotel
Straight Wharf Restaurant
Black Eyed Susan's (breakfast)
The Endeavor (Sailing excursion, $40 for 1.5 hours)
Cisco Brewery (brewery, winery, vodka distillery in one)

5.28.2014

Blackberry Bourbon Lemonade


I've been MIA lately, due to some serious (and unsuccessful) house hunting. It's been completely overtaking my brain, so I really need to force myself to focus on other things.

So today I wanted to share a great summery cocktail: the blackberry bourbon lemonade. It's a delicious mix of sparkling lemonade, blackberry and rosemary simple syrup, and of course, bourbon.

This makes a great drink for a summer party, due to it’s all American ingredients (bourbon, lemonade) and it’s festive red color (which you can make red, white, and blue with the addition of a blackberry garnish), and its big-batch recipe that makes 12 drinks.
 
Blackberry Bourbon Lemonade, originally from Better Homes and Gardens
Here I'm providing the 1 gallon big batch version, click the link above for a single serving size. 

3 cups bourbon
2/3 cups lemon juice
1 recipe blackberry rosemary simple syrup (below)
4 cups sparkling lemonade
Blackberries, for garnish

Combine bourbon, lemon juice, simple syrup in a large pitcher or punch bowl. Stir. Add sparkling lemonade and garnish with blackberries.

Makes 12 5oz servings.

Blackberry Rosemary Simple Syrup
12 oz fresh blackberries
1 1/2 tbsp rosemary, roughly chopped
3/4 cup water
1/4 sugar

Combine all ingredients in a saucepan over medium heat. Bring to a boil, reduce heat, and simmer, uncovered, for 25 minutes, until blackberries are breaking down and the liquid is syrupy and reduced by half.  Mash the blackberries into the liquid with a wooden spoon towards the end of cooking.  Strain through a fine strainer, pressing on the berries to extract juice. Let cool, and store in fridge for up to one week.

5.07.2014

Roasted Chicken Cacciatore


I hate chicken cacciatore. It seems like something I should enjoy, since I'm a fan of its principal ingredients: chicken, peppers, and tomatoes. And I love long, slow cooked Sunday dinners.

But I hate it. Something about the braising chicken over the stove, the thick sauce, the muted way the peppers taste when smothered and simmered- it disgusts me I’ve tried lots of recipes- Mario, Marcella, my own made up concoctions- and nothing’s appealed to me.

Until now. Last month’s Food and Wine featured recipes from Giada’s new Vegas restaurant, including her roasted version of chicken cacciatore. The photo looked perfect- caramelized, un-saucey chicken, surrounded by bursting cherry tomatoes, softened peppers, and wonderfully browned fennel.  Certainly not traditional, but worth a try.

This was the version I’ve been looking for. The chicken is rubbed with a red wine, butter, and herb blend, and roasted on a bed of the traditional cacciatore vegetables, with just a bit of broth, which creates a light sauce. The chicken was flavorful and delicious, and the apartment smelled like an Italian feast day from the peppers and onions (not usually a bonus, but welcome on a Sunday!). It was even better the next day cold in sandwiches, topped with leftover peppers.

This is definitely a keeper.


Chicken Cacciatore with Red Wine Butter, adapted from Giada de Laurentiis
Note: Giada’s recipe calls for a whole chicken, I adapted the version below for a chicken cut into 8 pieces, since that’s what I had in my freezer. Click the link above for her original version.\\
Serves 4

1 whole chicken, cut into 8 pieces
2 bell peppers, thickly sliced
1 cup cherry tomatoes
1 small bulb fennel, sliced through the core
3 cloves garlic, smashed
1 large shallot, sliced
1 cup red wine
2 tbsp butter, softened
2 tbsp tomato paste
8 springs fresh thyme
1 tsp oregano
½ cup broth
½ cup Castelvetrano olives, pitted and chopped
Fresh basil and parsley, for garnish
Salt, pepper, olive oil

Up to one day in advance, arrange chicken pieces in a baking dish and sprinkle with a good amount of salt and pepper. Remove thyme leaves from branches and stuff under the skin. Cover, and refrigerate.

In a saucepan, boil 1 cup of red wine until reduced to two tablespoons. Combine with tomato paste and butter, and let cool slightly.

Preheat oven to 425.

While oven preheats, rub red wine/tomato/butter mixture on chicken and under skin. Let sit at room temp for a half hour.

Just before roasting, add peppers, fennel, garlic, shallot, oregano, and tomatoes to the pan. Pour in ½ cup broth and drizzle entire baking dish with some olive oil.

Roast for one hour, or until a meat thermometer inserted into thigh and thickest part of breast registers 165.

 Garnish with basil, parsley, and olives. Serve and enjoy!

5.05.2014

Mother's Day Menu

I’m not sure why Mother’s Day is always associated with brunch. I’m thinking of doing dinner for my mom this year, and here’s the menu I’ve got in mind:
Antipasto Platter
I pretty much think anything in life is better when it starts with a cheese and salumi platter. I love combining taleggio, hunks of fresh parmesan, and crackers with olives and prosciutto. Yum.


This is a spectacular, and easy, recipe. The whole thing comes together in the time it takes to boil and cook the pasta. The clams make it a little special, the wine sauce is elegant, and the addition of arugula lends a fresh, peppery bite, perfect for springtime alfresco dining. This is a favorite.
 
Personal Pic (can't you tell?)
 
My mom doesn’t have much of a sweet tooth, and she’s always on a diet. This cake, made with almond flour and olive oil, is a bit of a healthier alternative to a butter cake, and it provides the perfect elegant but not too sweet end to a meal.


5.02.2014

Fashion Friday: Flat Sandals

I don’t think flat sandals are ever “out,” but I’m liking this year’s simple, earthy take on the style. 
 
Below, my favorite options for summer 2014:


J.Crew, $138 //  Shellys London, $70 // J.Crew, $98  // Sperry, $60  // Jack Rogers, $110  //  Paolo Bentini, $80  //  Ted Baker London, $150  //  Dolce Vita, $59